Brakes are one part of a vehicle that you never want to second-guess. A soft pedal or delayed stopping can turn a normal drive into a stressful one, especially in sudden traffic situations.
That is the point where understanding how to bleed brakes becomes important for both safety and control.
Brake bleeding is not just a repair step used in shops, but it is a safety process that keeps your braking system firm, responsive, and reliable during daily driving.
Over time, air can enter the brake lines during repairs or fluid changes, weakening braking power without obvious warning signs.
In this blog, you will learn proven methods used by mechanics, why each step matters, and how to avoid common mistakes with precision.
What Does It Mean to Bleed Brakes?
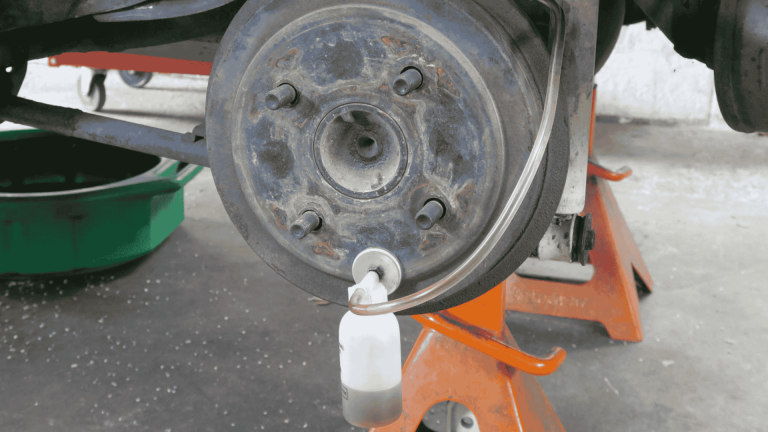
Bleeding brakes means removing trapped air from the brake lines so hydraulic pressure works the way it should.
Brakes rely on fluid to transfer force from the pedal to the wheels. When air enters the system, that pressure becomes weak and uneven.
Air in brake lines compresses when the pedal is pressed, unlike brake fluid, which does not.
This causes a soft or spongy pedal and increases stopping distance, which can lead to brake failure under heavy braking.
Brake bleeding is not the same as a brake fluid flush. Bleeding focuses on removing air from the lines, while a fluid flush replaces old brake fluid.
Both serve different purposes but are often done together during professional brake service.
Correct Bleeding Procedure for Brake Systems
Using the correct bleeding order is a key part of how to bleed brakes the right way. Bleeding in the wrong order can leave air trapped in the system and lead to a soft brake pedal.
- Farthest Wheel First: Most vehicles start bleeding at the wheel farthest from the master cylinder to remove trapped air efficiently.
- Typical Sequence: The common order is right rear, left rear, right front, then left front of the vehicle.
- Master Cylinder Location: The bleeding order depends on where the master cylinder sits in the vehicle.
- Line Length Priority: Longer brake lines are always bled before shorter ones.
- One Wheel at a Time: Professionals fully bleed one wheel before moving to the next.
AWD systems and vehicles with traction control can have more complex plumbing, which may require special procedures or tools to remove air completely.
Manufacturers specify a unique bleeding sequence, especially for ABS-equipped vehicles.
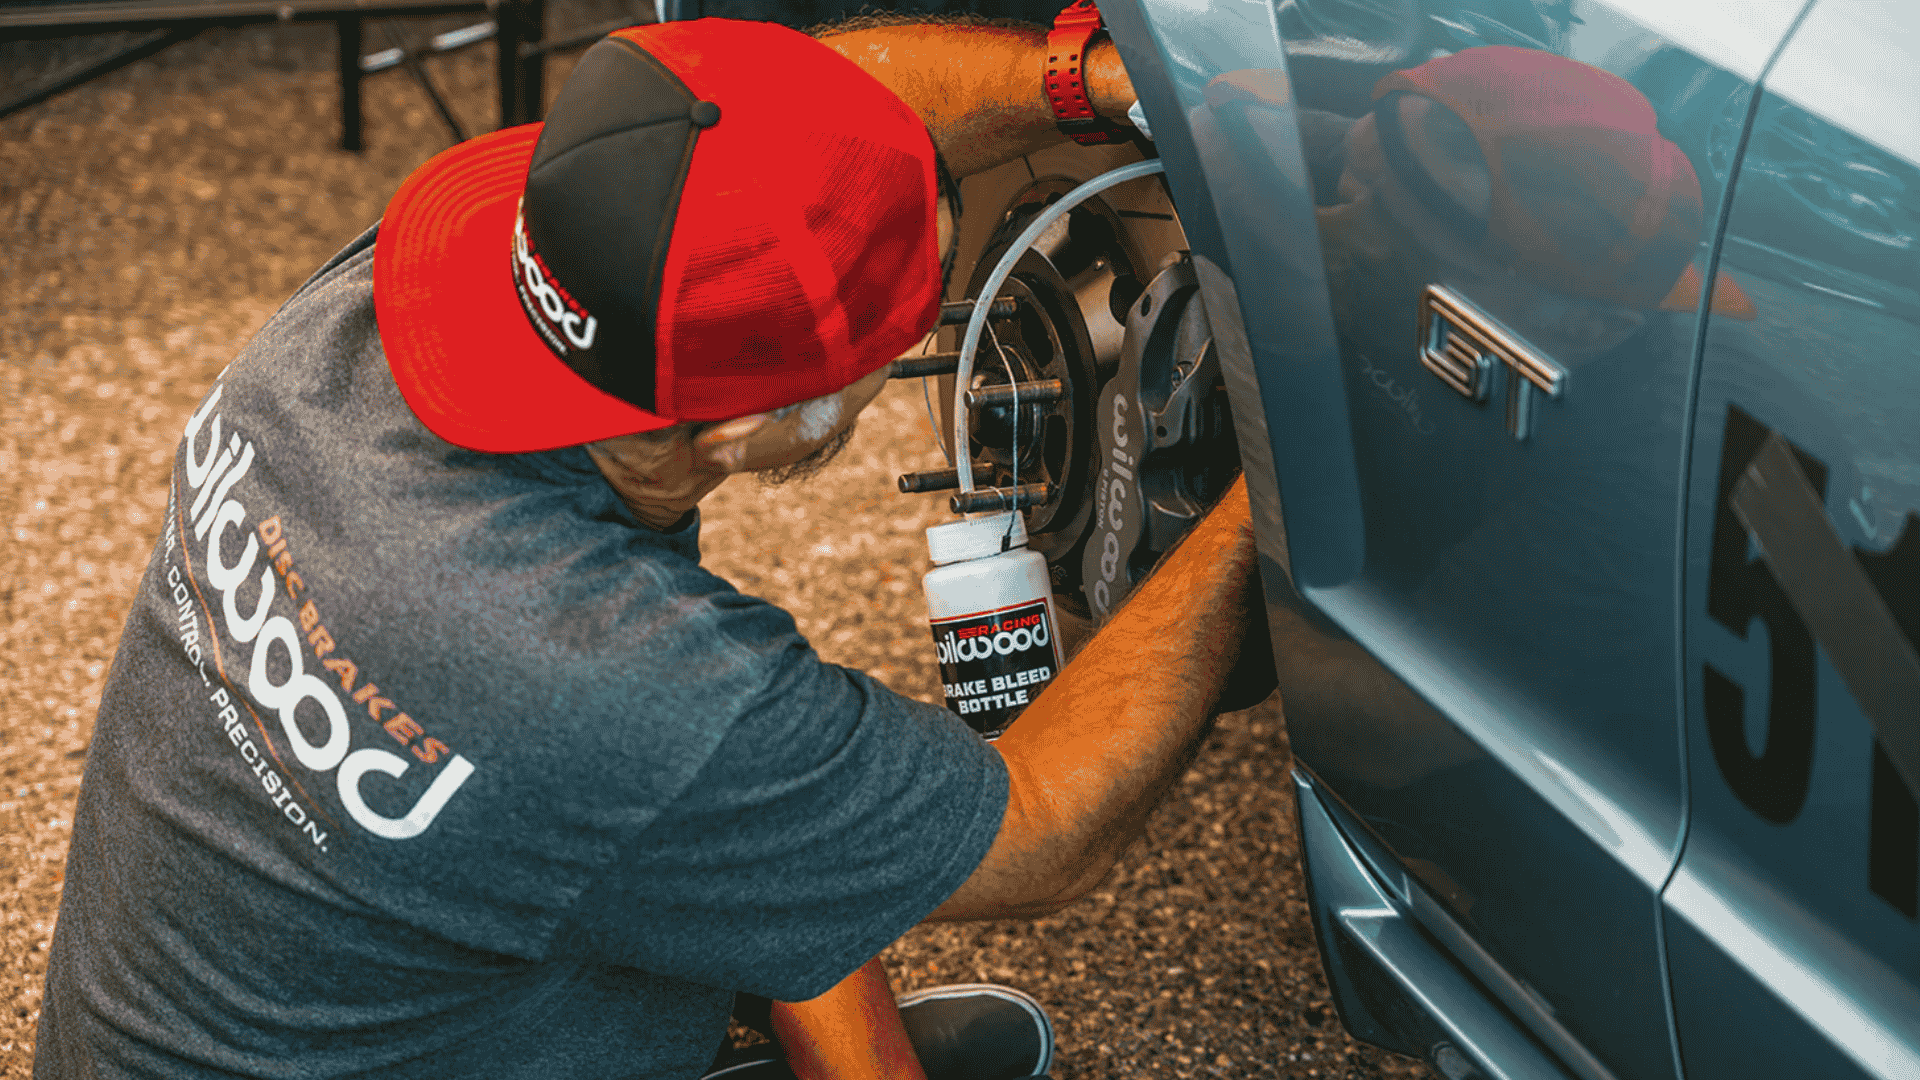
Tools and Materials Professionals Use
Knowing the correct equipment is essential in learning how to bleed brakes, which helps remove air efficiently. The right setup also reduces the risk of contamination.
Materials and tools commonly used include:
- Brake fluid that matches the vehicle manufacturer’s specifications (DOT 3, DOT 4, DOT 5.1, or DOT 4 LV)
- Box-end or flare-nut wrench sized for the bleeder screws
- Clear plastic tubing to monitor air bubbles
- Catch bottle or fluid container for used brake fluid
- Vacuum pump or pressure bleeder for faster, controlled bleeding
- Safety gloves and glasses to protect skin from brake fluid
Professional Methods for Bleeding Brakes
Each method removes air from the brake lines and can be used at home as well. Some methods work best for basic systems, while others are faster and more precise for modern vehicles.
1. Manual (Two-Person) Brake Bleeding Method
The manual method is a common way professionals show beginners how to bleed brakes.
One person pumps the brake pedal while the other opens and closes the bleeder valve. The pedal is pressed slowly and held down while air and fluid escape.
Professionals avoid pumping too fast, which can add air back into the system. They also make sure the master cylinder stays full.
This method is simple, reliable, and works well on many older vehicles without ABS.
2. Gravity Brake Bleeding Method
Gravity bleeding is a slow but easy method used by professionals when the brake system is simple.
It relies on gravity to move brake fluid through the lines. The bleeder screw is opened, and fluid flows out on its own.
This method works best when replacing brake fluid or removing small air bubbles. Professionals recommend it for basic systems but not for stubborn air problems.
It takes more time and may not fully clear the air in complex brake systems.
3. Vacuum Brake Bleeding Method
Vacuum bleeding uses a pump to pull fluid and air out of the brake lines. Professionals connect the vacuum tool to the bleeder screw and apply steady suction.
This method makes bleeding brakes faster and easier for one person.
It works well for most vehicles and reduces pedal pumping errors. However, professionals watch for air leaks around the bleeder threads.
Vacuum bleeding is best for routine maintenance and systems that do not require special ABS procedures.
4. Pressure Brake Bleeding Method
Pressure bleeding is often the preferred method in professional repair shops.
A pressure bleeder pushes brake fluid from the master cylinder through the system. This keeps constant pressure and prevents air from entering the lines.
This method is fast, clean, and very effective while learning how to bleed brakes.
When done correctly, pressure bleeding delivers a firm pedal and consistent braking with less effort and fewer mistakes.
Bleeding Brakes on ABS-Equipped Vehicles
Bleeding brakes on vehicles with ABS is different because the system includes extra valves, pumps, and sensors that can trap air inside the ABS module.
This trapped air cannot always be removed using basic bleeding methods.
Professionals recommend starting with a standard brake bleed to remove air from the brake lines first.
In many cases, a scan tool is then needed to activate the ABS pump and valves, which allows trapped air to move out of the system.
Scan tools are required when the ABS unit has been opened, replaced, or when the brake pedal remains soft after normal bleeding.
Mechanics also follow manufacturer-specific procedures to avoid damaging the ABS system.
How to Bleed Brakes on a Motorcycle and How It Differs From Cars?
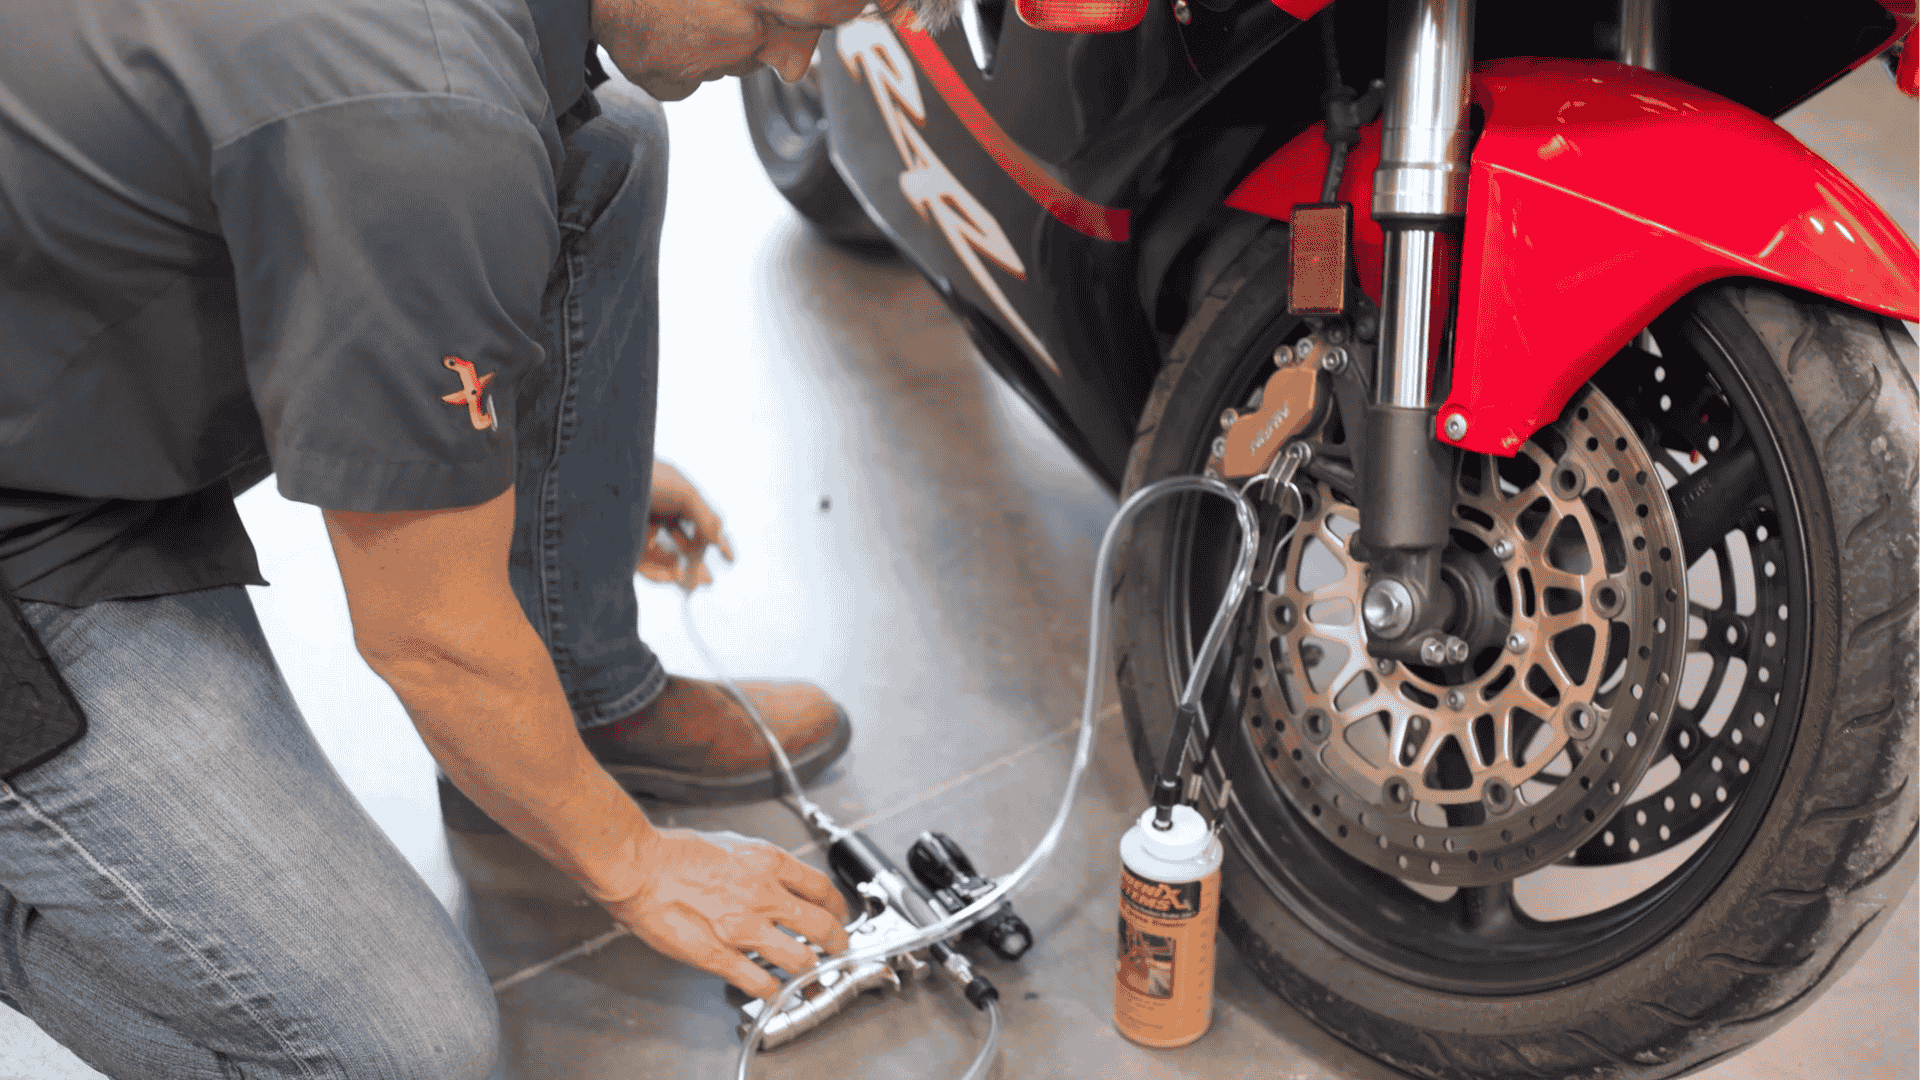
Bleeding brakes on a motorcycle follows the same basic idea as cars, but the process is usually simpler.
Motorcycles have shorter brake lines and smaller systems, which makes air easier to remove. To bleed motorcycle brakes, start by placing the bike upright on a stand.
Open the master cylinder, attach clear tubing to the caliper bleeder valve, and keep the fluid level full up to the brim.
Slowly squeeze the brake lever, open the bleeder screw, then close it before releasing the lever. Repeat until no air bubbles appear and the lever feels firm.
The main difference from cars is that motorcycles often have separate front and rear brake systems and use a hand lever instead of a pedal.
Real User Reviews About Brakes Bleeding
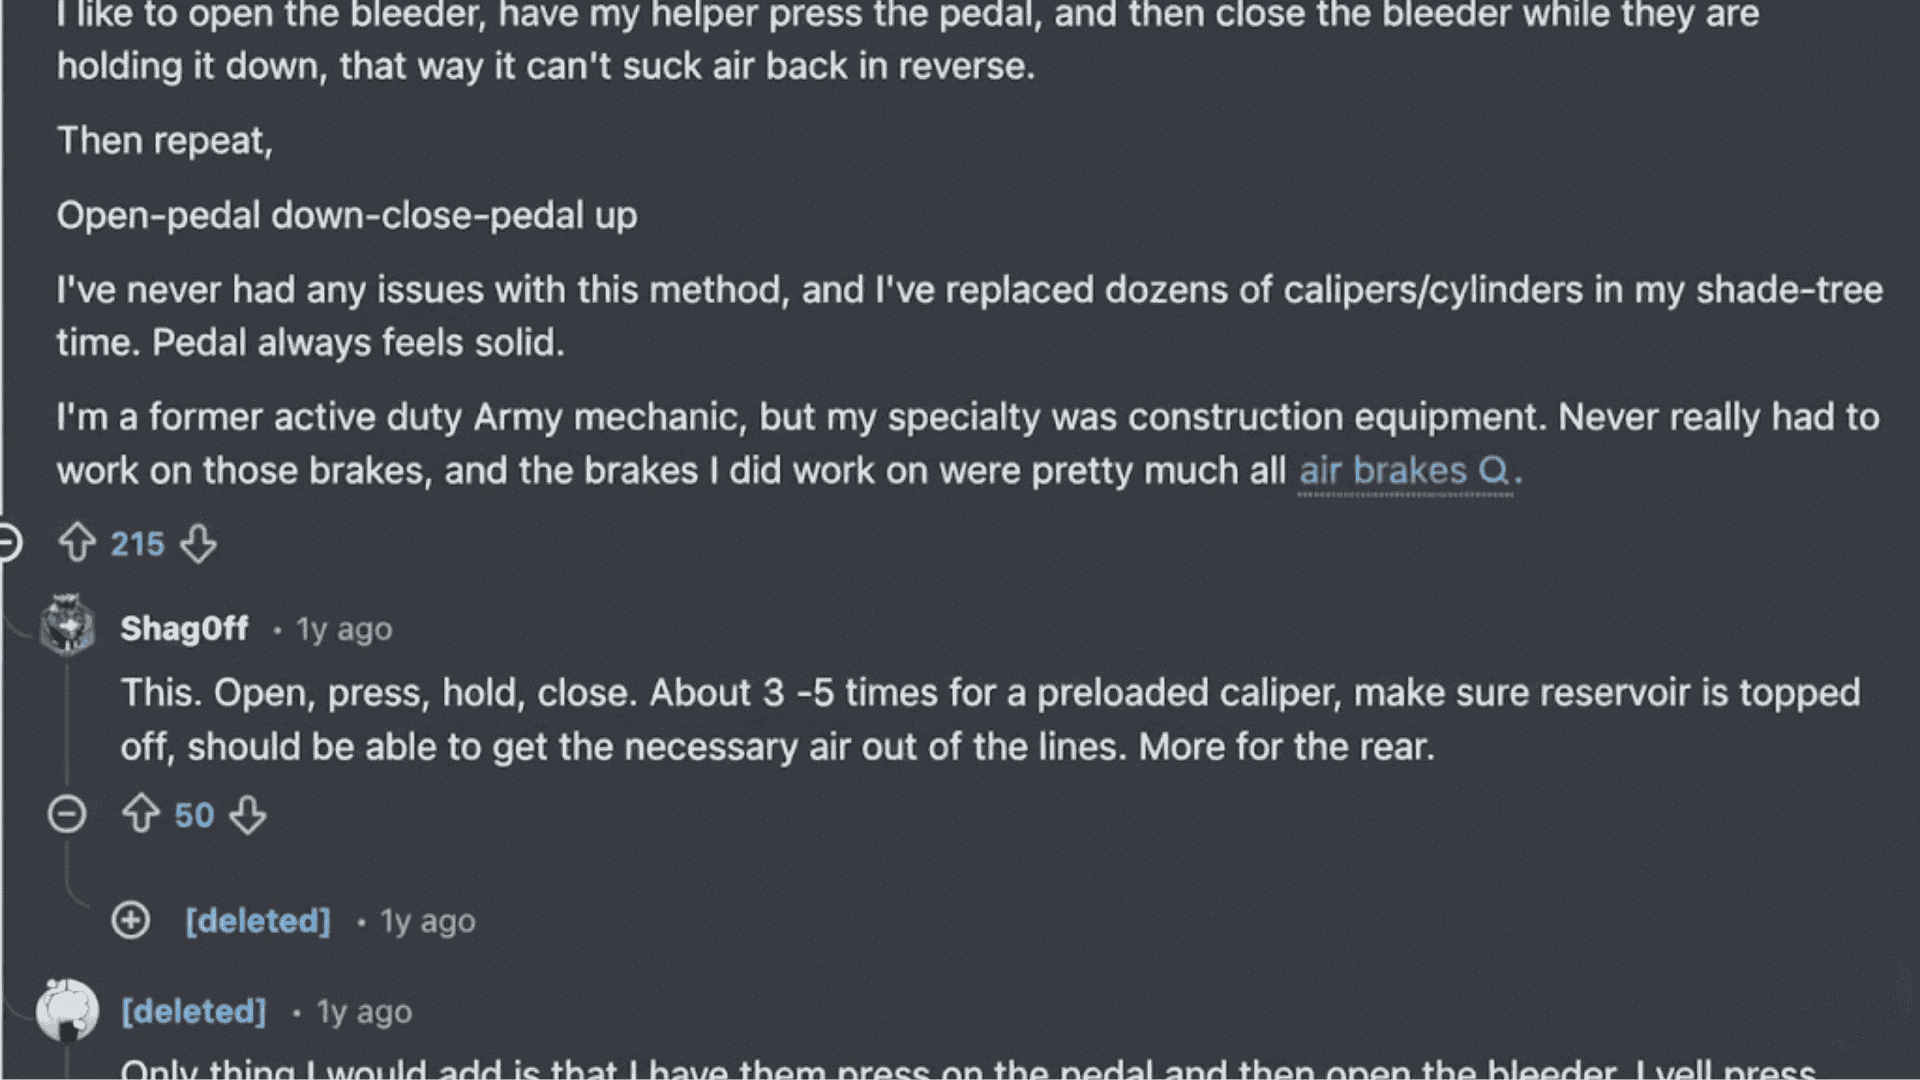
Reddit mechanics agree that brake bleeding feels simple in theory, but tricky in real life. A standard tip on how to bleed brakes is the classic two-person method done the right way.
Most users stress pressing the pedal first, holding it down, then opening and closing the bleeder before the pedal comes up.
This helps stop air from getting pulled back into the system. Several techs also warn not to push the pedal all the way to the floor, since that can damage the master cylinder on older cars.
Others swear by gravity bleeding, especially after replacing a single caliper.
Letting fluid flow on its own can remove most air without pumping. Pressure bleeders also get a lot of praise for saving time and giving firm results.
Overall, Reddit agrees there is no single perfect method, but patience, fluid level checks, and the correct order make all the difference.
Signs Your Brake System Needs Bleeding
Knowing when to bleed brakes is as important as how to bleed brakes. Watch for clear signs that air has entered the brake system or fluid condition has changed.
- Spongy Brake Pedal: A soft or sinking pedal is a common sign that air is trapped in the brake lines and needs attention.
- Longer Stopping Distance: If the vehicle takes longer to stop, professionals check for air in the brake system immediately.
- Brake Repairs Completed: Bleeding is required after brake line, caliper, hose, or master cylinder repairs.
- Brake Fluid Replacement: Anytime brake fluid is changed, bleeding removes trapped air.
- Service Interval Reached: Manufacturers often recommend bleeding or flushing brakes every 2–3 years.
Common Brake Bleeding Problems and Fixes
The following highlights the most common brake bleeding problems and the professional fixes used to restore proper brake performance.
| Problem | Professional Fix |
|---|---|
| Spongy brake pedal | Re-bleed the brakes to remove trapped air from the lines. |
| Pedal slowly sinking | Inspect the master cylinder and bleed again if air is found. |
| Air keeps appearing | Tighten bleeder screws and check for loose fittings. |
| Brake fluid leaks | Repair or replace damaged lines or seals before bleeding. |
| Soft pedal after ABS service | Use a scan tool to cycle the ABS system and bleed again. |
Mistakes to Avoid When Bleeding Brakes
Even when following proper steps for how to bleed brakes, small mistakes can lead to poor braking performance. Avoiding them helps keep the brake system safe and reliable.
- Letting the Master Cylinder Run Dry: Allowing the fluid level to drop introduces air into the entire brake system.
- Using the Wrong Brake Fluid: Mixing incorrect fluid types can damage seals and reduce braking performance.
- Incorrect Bleeding Order: Bleeding wheels out of sequence can trap air in longer brake lines.
- Overtightening Bleeder Screws: Excess force can strip threads or damage the caliper.
- Pumping the Pedal Too Fast: Rapid pumping can create foam and pull air back into the system.
How to Check If Brakes Are Properly Bled?
After learning how to bleed brakes, professionals always verify the results before driving.
The first check is pedal feel; a properly bled system should have a firm pedal that does not sink when held down. A soft or spongy pedal usually means air is still present.
Visual checks include inspecting bleeder screws, brake lines, and the master cylinder for leaks or fluid loss.
Functional checks involve pressing the pedal several times with the engine running to confirm consistent pressure.
A short road test is the final step. Brakes should respond quickly, stop smoothly, and feel stable during light and moderate braking without pulling or vibration.
Conclusion
Bleeding brakes the right way helps keep your vehicle safe and responsive on the road.
Brake bleeding practices focus on removing all trapped air, using the correct tools, and following the proper bleeding order.
Using manual, vacuum, or pressure methods, accuracy and patience matter at every step.
Safety is always the priority, from choosing the right brake fluid to preventing air from entering the master cylinder.
Professionals also stress the importance of checking pedal feel and testing brakes before driving.
Following these guidelines will help you understand how to bleed brakes, maintain strong braking performance, and reduce the risk of failure.
If you have thoughts to include or want to share your experience, leave a comment below and join the discussion.
Frequently Asked Questions
Are Bleeding Mountain Bike Brakes Different From Bleeding Car or Motorcycle Brakes?
Yes, bleeding brakes on a mountain bike is different because MTB brake systems are hydraulic and fully sealed. They use either mineral oil or DOT fluid, based on the brand.
Is It Possible to Bleed Brakes Without Removing the Wheels?
Yes, some vehicles allow access to bleeder screws without removing wheels, but removing them gives better visibility and reduces mistakes.
How Often Should Brake Systems Be Bled?
As a general rule, brake systems should be bled every two to three years or anytime brake components are serviced to maintain proper braking performance and safety.
How Much Brake Fluid is Usually Needed for Bleeding?
Most vehicles need one to two quarts of brake fluid for a complete brake bleeding process. The exact amount depends on the size of the brake system, the length of the brake lines, and how much air is trapped inside.